Connecteur JSON API

Le JSON API connector StartMsg facilite la transmission de données importantes vers n'importe quelle URL externe que vous spécifiez. Par exemple, lorsqu'un événement déclencheur choisi se produit, le système envoie automatiquement des données au format JSON vers l'URL webhook spécifiée. Il attend jusqu'à 10 secondes une réponse ; s'il n'en reçoit pas, il renvoie la requête. C'est une excellente façon d'intégrer StartMsg à d'autres plateformes tierces comme Zapier, ou de créer des solutions entièrement personnalisées. JSON API Les fonctionnalités de Connector sont faciles à trouver dans la section “ Messenger Bot ” du menu.
Gestion complète de la connexion
En utilisant la JSON API panneau du connector, vous pouvez non seulement créer de nouvelles connexions, mais aussi surveiller l'activité, modifier les connexions existantes ou supprimer celles dont vous n'avez plus besoin. Cela facilite la gestion de tout le processus de communication avec les systèmes externes, la réaction rapide aux changements et l'ajustement de la configuration à vos besoins.
Créer une nouvelle connexion est simple
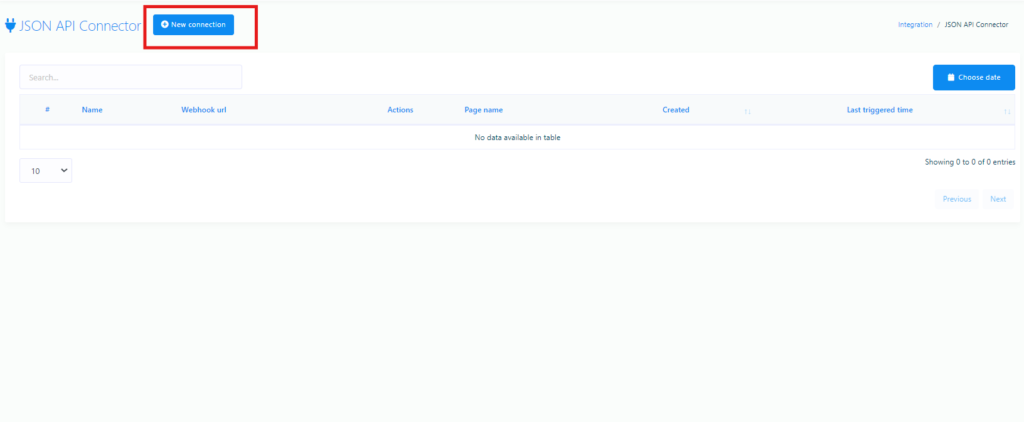
Pour créer une nouvelle connexion, il suffit de cliquer sur le bouton “Nouvelle connexion” et suivez ces quelques étapes simples :
- Nom de la connexion: Nommez la connexion de manière à l'identifier facilement parmi les autres.
- URL du webhook: Saisissez l'URL à laquelle les données seront envoyées. Vous pouvez obtenir cette URL depuis d'autres applications comme Zapier, ou la pointer vers l'URL de votre propre application. Les données JSON sont envoyées à cette URL et le système attend jusqu'à 10 secondes une réponse.
- Choisir une page: Dans ce champ, vous pouvez sélectionner une page connectée au bot Messenger dont vous souhaitez collecter des données.
- Quel champ déclenche le webhook: Choisissez le champ qui doit déclencher le webhook. Les options incluent l'e-mail, le numéro de téléphone, la localisation, le postback, la date de naissance ou les formulaires webview. Par exemple, si vous sélectionnez l'e-mail, le webhook se déclenche lorsqu'une nouvelle adresse est collectée par le bot Messenger. Si nécessaire, vous pouvez sélectionner plusieurs champs.
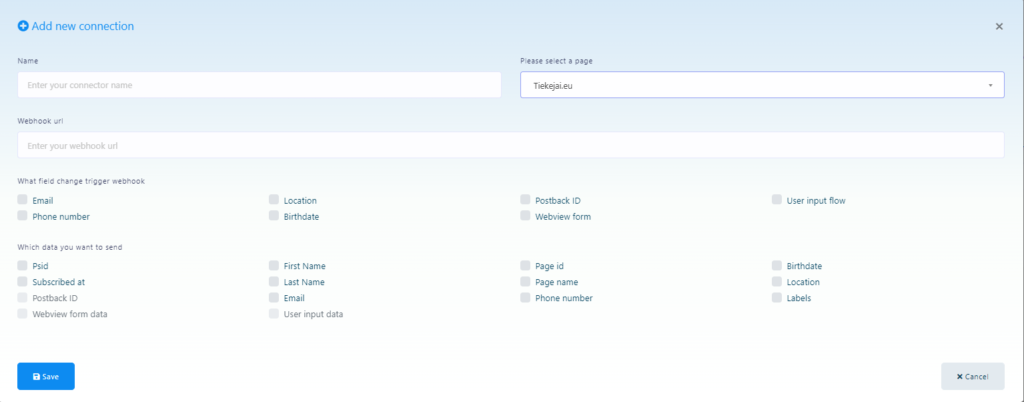
- Quelles données vous souhaitez envoyer: Choisissez les informations qui seront envoyées lors du déclenchement du webhook. Voici un exemple de ce à quoi les données peuvent ressembler :
{
“ psid ” : ” 12765756 »,
“ first_name ” : ” Test ”,
“ last_name ” : ” User ”,
“ subscribed_at ” : ” 15/01/2024 12:19:04 »,
“ email ” : ” testuser@gmail.com ”,
“ labels ” : ” Demo, Demo Label 1, new-label-test ”,
“ page_id ” : ” 37674343246 »,
“ page_name ” : ” Page de test ”,
“ phone_number ” : ” +370628282846 »,
“ user_location ” : ” ”,
“ postbackid ” : ” ”,
“ subscriber_id ” : ” 2251324188330310 »,
“ webview_form_id ” : ” 83c567cd88 »,
“ product-type ” : ” Chaussures ”,
“ Taille ” : ” Moyenne ”,
“ Numéro de téléphone ” : ” 88823 »,
“ Date de livraison ” : ” 15/01/2024 »
}
Effacer les rapports de connexion
Vous pouvez suivre toutes les connexions que vous créez depuis le tableau de bord. Le rapport d'activité vous permet de consulter les 10 dernières actions ainsi que les principaux paramètres. Si une connexion se déclenche avec succès, le code HTTP affichera “ 200 ”. La section « Rapports » vous permet également de voir quelles données ont été envoyées lors des derniers déclenchements.
Ajouter un script PHP comme URL du webhook
Si vous souhaitez utiliser votre propre script pour recevoir des données JSON, vous pouvez le faire en ajoutant votre URL en tant que webhook. Par exemple, si votre domaine est “https://example.com” et que le script s'appelle “ test.php ”, l'URL du webhook sera “https://example.com/test.php“ . Lorsque l'événement déclencheur sélectionné se produit, le système envoie des données à cette URL. Pour recevoir des données au format JSON, ajoutez ce code à votre fichier “ test.php ” :
$webhook_data = file_get_contents(“php://input”);
$webhook_data_array = json_decode($webhook_data, true);
En utilisant le StartMsg JSON API connector, vous pouvez non seulement automatiser des opérations commerciales importantes, mais aussi adapter la plateforme pour qu'elle fonctionne avec les autres applications que vous utilisez.